Traveling Waves
For the following activities, you will use both the Wave on a String PhET simulation and a long slinky or spring.
1. With the Oscillate button on and with No End checked, investigate the Amplitude slider. Write answers to the following after your group has talked about each and agreed.
- Define Amplitude in everyday language.
- Explain how the wave behaves as the Amplitude
- Use a slinky or giant spring on the floor. Describe how you change the Amplitude of a transverse wave and a longitudinal wave on the spring or slinky.
2. Repeat the above for Frequency, Tension and Damping.
Vertical position vs. Horizontal position graphs
1. Set Amplitude on medium/high, Frequency and Tension on low, Damping to zero. Also, have on Oscillate, Timer and No End. Use the Pause button to freeze the wave.
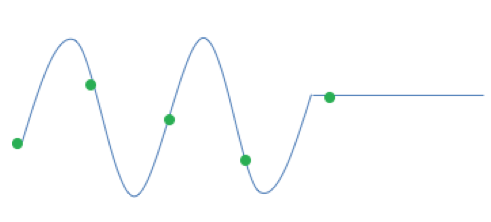
- Place a blank piece of paper on your monitor and trace the wave (as a continuous line) and the wave generator. Fill in circles over the green balls. Label your axes. This is a Vertical position- horizontal position graph

- Press Play, and then Pause Use the same piece of paper, put it on the monitor and make sure to get the generator in the same spot. Trace the new wave and fill in over the green balls.
- Describe how your picture changes and how the green balls change. You may have to do some more tests by pressing Play, then Pause and tracing to test your ideas.
- Try some other settings and explain why the above settings were recommended to create this graph.
Vertical position vs.Time graph
1. Set Amplitude on medium/high, Frequency and Tension on low and Damping to zero. Also, have on Oscillate, Timer and No End. Use the Pause button to freeze the wave.
- Measure the vertical location of a green ball with a ruler and record this position and the time.
- Quickly press Play, then Pause and take a new measurement of the same green ball’s vertical position and time.
- Repeat the above procedure until you have 15 data points.
- Graph vertical position versus time using your data.
- Describe the differences and similarities between vertical position vs. horizontal position graphs and vertical position vs. time
2. Refer to your Position vs. Time graph from step 4 above. Sketch the corresponding velocity versus time graph.
3. Now sketch the corresponding acceleration vs. time graph. Check with your instructor before moving on.
4. Investigate how waves behave when the string end is Fixed compared to Loose when you use Pulse. Describe any differences you observe in how the wave reflects from the end.
Standing Waves
In the Wave on a String sim set Amplitude = 3, Frequency = 50, Damping to 0 and Tension high.
1. If the sim is set on Oscillate with a fixed end, what happens as you observe for a minute (literally a minute!)? Describe why this happens using your results from 7 above.
2. If the sim is set on Oscillate with a Loose end, what happens as you observe for a minute (again 1 full minute)? Describe why this happens using your results from 7 above.
In this next section of the lab you will study the standing wave patterns produced in a vibrating string.
When a wave propagates along a string, the wave speed is determined by the physical characteristics of the string: the tension (T) and the density of the string (m).
![]()
Hence, as the Tension increases, the speed that waves travel on the string increases. Conversely, if the density increases, wave speed decreases.
Standing Waves: A wave generated at one end will travel to the other end and reflect back. If the timing is right, the reflected wave will constructively interfere with the next wave that was generated. Meaning the two waves will add, pulling up or down on the string at the same time. If the timing is off, the interference will not create a standing wave.
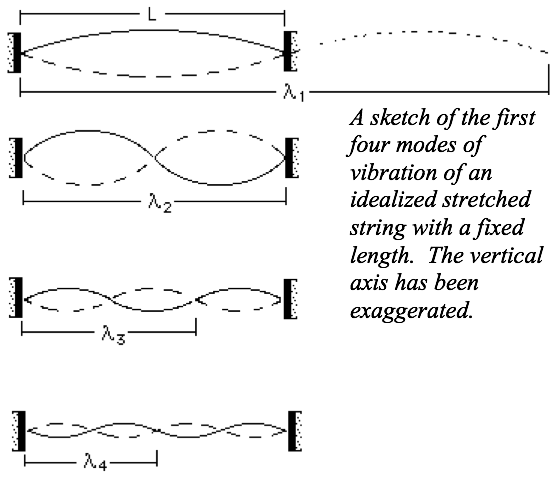
Let’s work out the relationships among the frequencies of the modes shown to the right. For a wave, the frequency is the ratio of the speed of the wave to the length of the wave: f = v/λ.
Compared to the string length L, you can see that these waves have wavelengths 2L, L, 2L/3, L/2. We can write this as: 2L /n where n is the number of the harmonic.

The fundamental or first mode has frequency f1 = v/λ1 = v/2L,
The second harmonic has frequency f2 = v/λ2 = 2v/2L = 2f1
The third harmonic has frequency f3 = v/λ3 = 3v/2L = 3f1,
The fourth harmonic has frequency f4 = v/λ4 = 4v/2L = 4f1, and, to generalize,
The nth harmonic has frequency fn = v/λn = nv/2L = nf1.
The nodes are the locations along the string where there is zero amplitude and the antinodes are the locations where the amplitude is a maximum.
Procedure –
Materials and equipment: string, wave driver, function generator, weights, weight hanger, meter stick
STEP 1 – Attach the string to the wave driver (basically a speaker that vibrates a post as well as air) and lay the other end of the string over the pulley. Attach a weight hanger to the end of the string nearest the pulley and then add 300 g to the weight hanger (350 g total). Connect the banana plug cables to the wave driver and then to the function generator. Select the sinusoidal output on the function generator. The function generator powers the wave driver; using the frequency control on the function generator you can vary the frequency of vibration of the string.
STEP 2 – Make sure that the wave driver is unlocked. Then vary the frequency of the function generator, f, and measure the wavelength, λ, for at least six different standing wave patterns. Try to keep the amplifier gain at about half of full value and start with frequencies in the range 0 to 100 Hz. Create a table that has three columns: # of loops, wavelength, and frequency. Hint: See description above for number of loops in a wavelength.
STEP 3 – Create a standing wave with as many loops as you can. When you’ve found the maximum number of clear loops possible, write you result on the board.
STEP 4 – Graph λ versus 1/f and determine the slope of your graph. What does the slope represent?
STEP 5 – Determine the speed of the waves on the string for varying tensions. Use the following hanging masses: 150 g, 200 g, 250 g, 300 g and 350 g. Use a two loop pattern for each measurement. Create a table with five columns: hanging mass, frequency f, wavelength λ, wave speed v = λf, and tension T.
STEP 6 – The speed of a wave is determined by the medium in which it travels. For a wave traveling on a string, the speed depends on the string tension and its density (mass/length).
How can you use part of your data from Step 5 to determine the density of your string, m? Hint: Create a graph and determining the slope. Consult your lab instructor to verify your plan.
STEP 7 – Directly measure the value of m. You will need to find the string’s length and mass. Compare this value to the one you found in STEP 6 by calculating the percent difference.
QUESTIONS –
- Explain any differences between your two values for the linear mass density. Which method is more accurate? What are the sources of error? Be explicit.
- Sketch the standing wave pattern for a string fixed at both ends when n = 4. Indicate the nodes and antinodes. If this string is 2.4 m long, has a mass of 0.010kg and the tension in the string is 5 N, what is the frequency of vibration?
- What was the largest number of loops created in lab today? Why do you think the group that won, was able to see more loops than other groups?
- What is the least number of loops possible? Why is this? Why can’t you have ½ a loop?
- The longest wavelength that fits on a particular string is called the Why is it that fundamental for a string fixed at both ends is 2L? Why can’t it be 4L for example? Include a diagram to explain why λ = 4L is physically impossible.
